

9. Certificates and addresses
Certificates are issued and renewed automatically.
Normally there is nothing for you to do.
This chapter explains where to look when an address does not open and how to add a domain.
To set up your address for the first time → Chapter 1
When an address does not open
First, check the domain connection screen in Chapter 1.
It shows which of the three steps it stopped at, so it is the fastest way to find the cause.
| Symptom | What to check |
|---|---|
| The name does not resolve at all | Check that the DNS records were entered correctly and that DNS propagation has finished. |
| The name resolves but you cannot connect | For direct serving, check port forwarding; for a tunnel, check that the server is running. |
| It cannot be reached only from outside | Your public IP may have changed → Advanced |
| A certificate warning appears | See When certificate renewal fails below. |
When certificate renewal fails
Certificates are reissued periodically, and the conditions used for the first issuance must still hold at renewal.
The following three problems can look fine at first and only surface when the certificate is renewed.
| What changed | Why it is a problem |
|---|---|
The _acme-challenge record was deleted | It is used not only at issuance but also at renewal. |
| The public IP changed but DNS did not follow | The certificate authority's validation request goes to the old address. |
| Port 80 was closed | For validation that uses port 80, such as the http01 method, the certificate authority sends its validation request to that port. |
Expiry warnings arrive by email
A notice is sent before the certificate expires to the notification email you entered during installation.
If you receive that email, check the three items above first.
Who issues the certificate?
| Address type | Who issues the certificate |
|---|---|
| Platform-provided address | We issue the certificate and handle HTTPS on our side. There is no certificate on your server. |
| Your domain + tunnel | We issue the certificate on your behalf. |
| Your domain + direct serving | Your server issues the certificate itself. |
When serving directly
The setup differs depending on whether you registered a Cloudflare API token.
| With token | Without token | |
|---|---|---|
| DNS records | Registered automatically | Enter them yourself → Advanced |
| Wildcard certificate | ✅ One certificate for many addresses | ❌ Issued separately for each address |
| Port 80 | Not needed | Required |
Automatic DNS setup supports Cloudflare only
Automatic DNS setup currently supports Cloudflare only.
Other DNS providers such as Route 53 and Google are not supported yet. If your domain is with another provider, install without a token and enter the DNS records yourself.
The Cloudflare API token needs both the Zone:Read and Zone:DNS:Edit permissions.
Platform-provided addresses and tunnels have no availability guarantee during the beta
When you use a platform-provided address or a tunnel, connections pass through our servers. Redundancy is not complete yet, so connections may drop temporarily.
For important services, the your domain + direct serving setup is recommended.
Adding more domains
Domains are managed in Admin → Domains / TLS. At first, only the one address included with your license is registered.
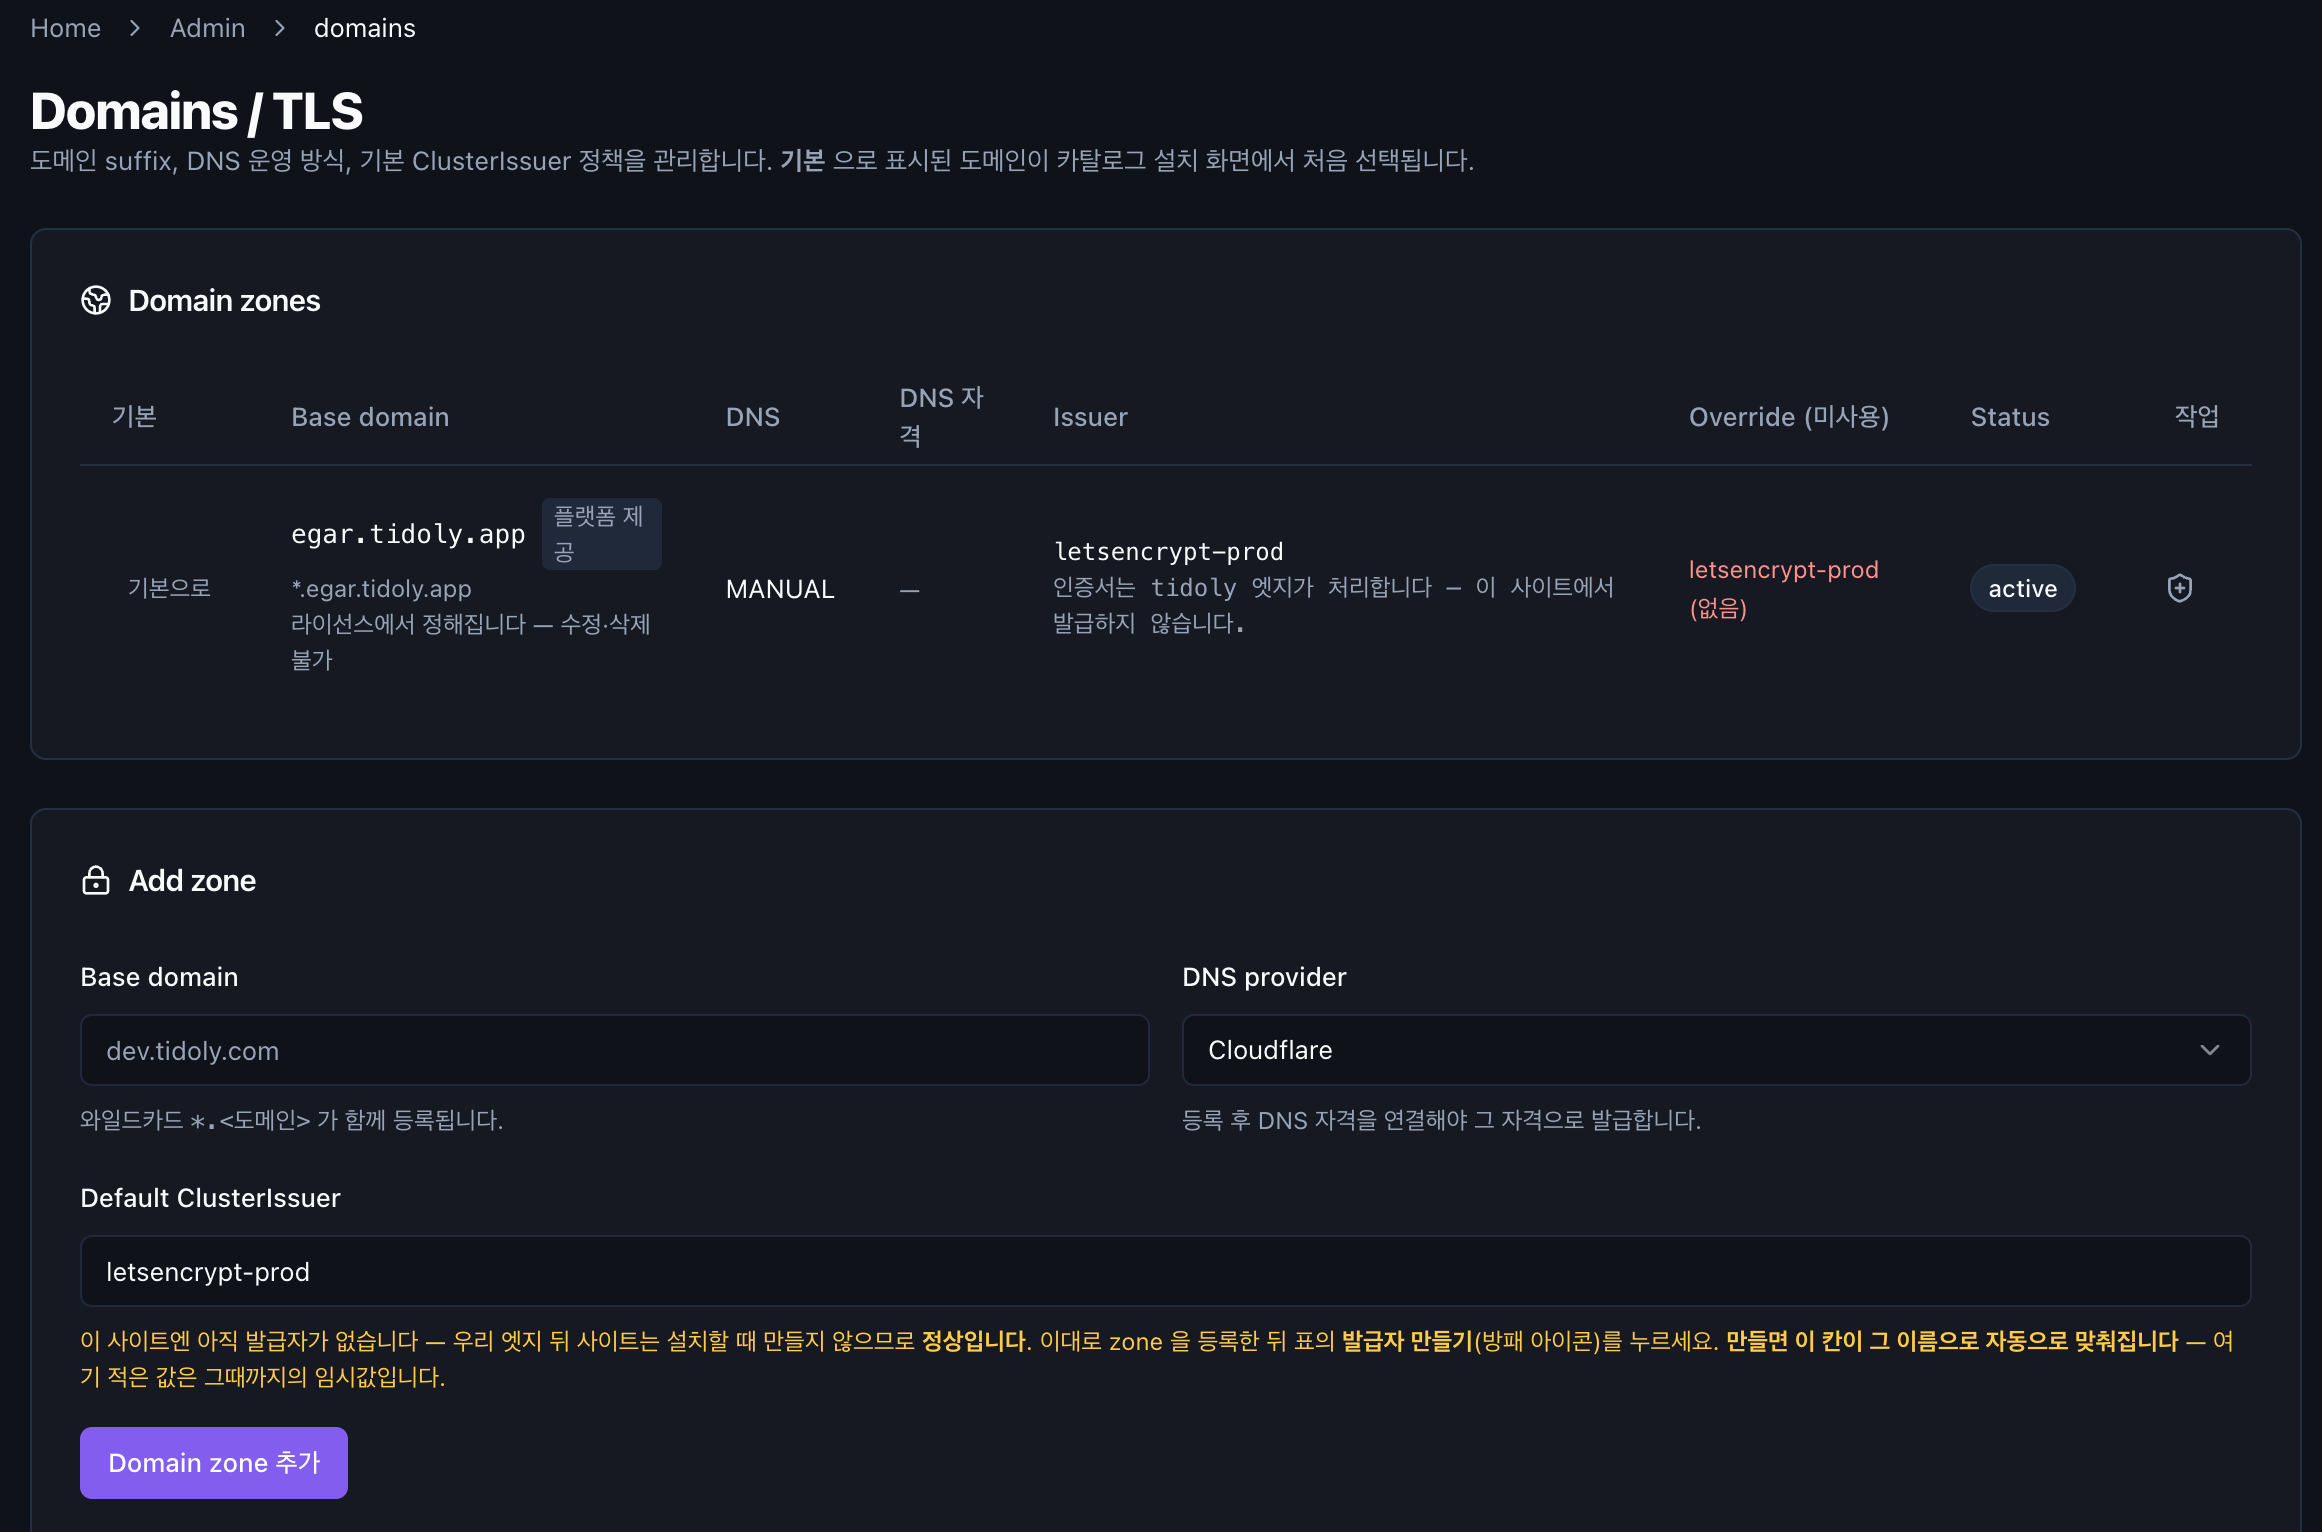
The platform-provided address cannot be edited or deleted. It is determined by your license.
Registering
- Register the zone. Enter
Base domainandDNS provider, then clickDomain zone 추가(Add domain zone). - Create the issuer. Click the shield icon in the table, then choose a contact email and the validation method.
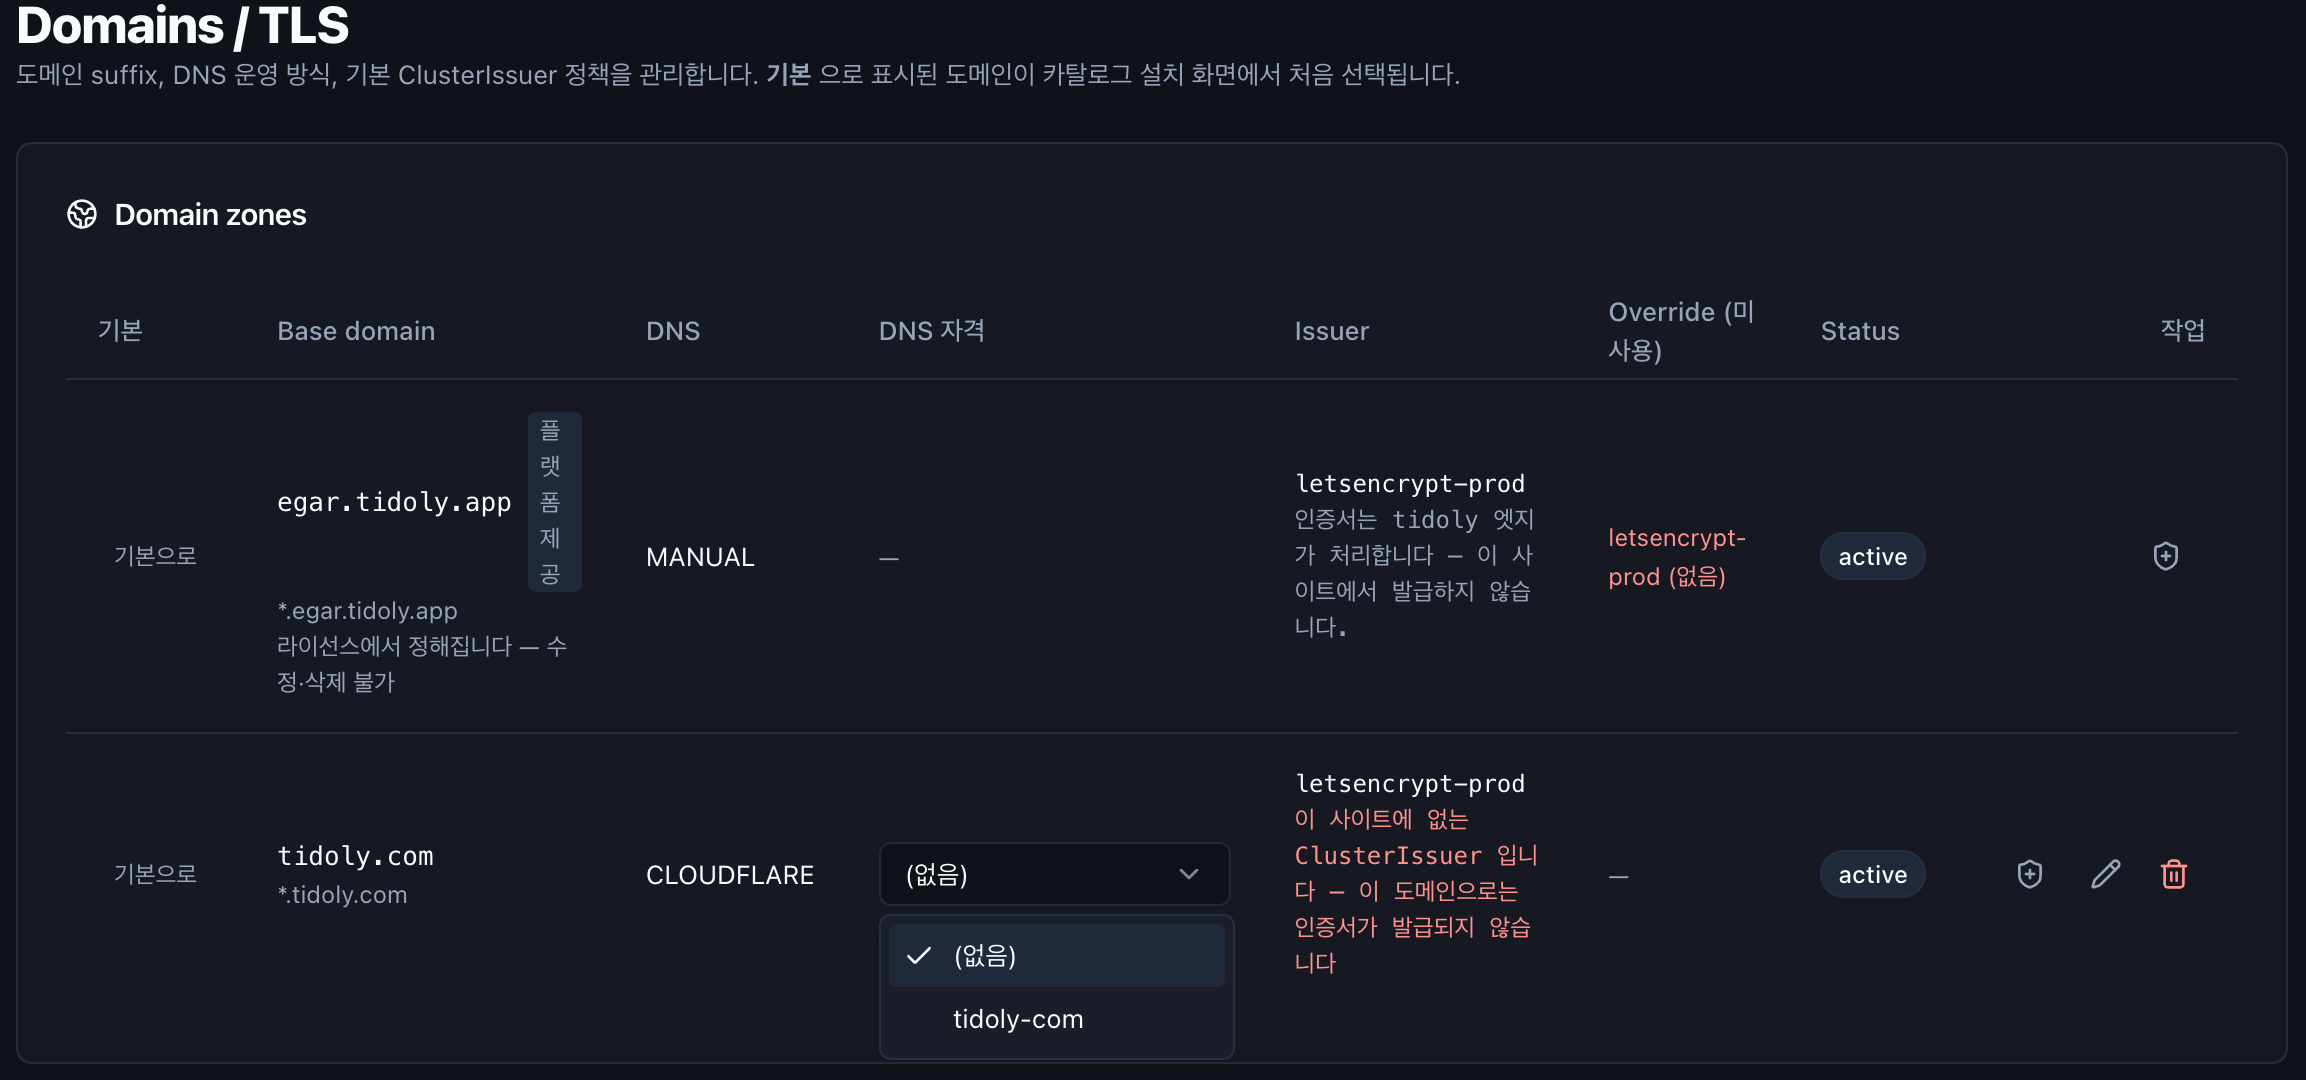
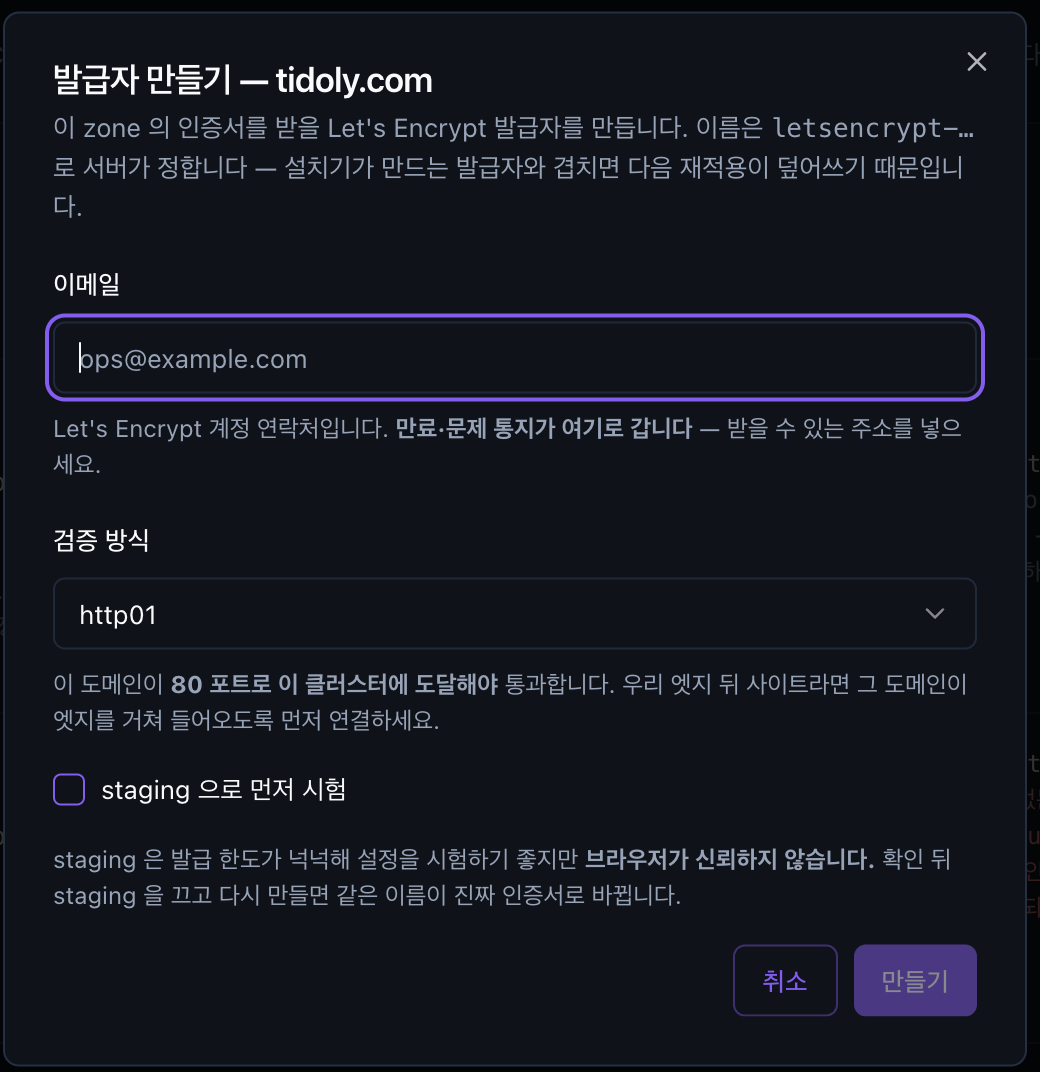
The wildcard *.<domain> is registered as well.
This is why you can use an address for each additional service without any separate certificate setup.
The required setup depends on the validation method
http01 | dns01 | |
|---|---|---|
| What you need | The domain just has to reach this cluster on port 80. | You must register a DNS credential for the zone. |
| Token | Not needed. | A Cloudflare API token is needed. |
| Wildcard | ❌ Issued separately for each address | ✅ One certificate for many addresses |
If port 80 is reachable from outside, http01 alone is enough.
So there is no need to create a separate API token.
When using dns01
Register the token in Admin → Credentials → DNS, then select the registered credential in the zone's DNS 자격 (DNS credential) field to connect it.
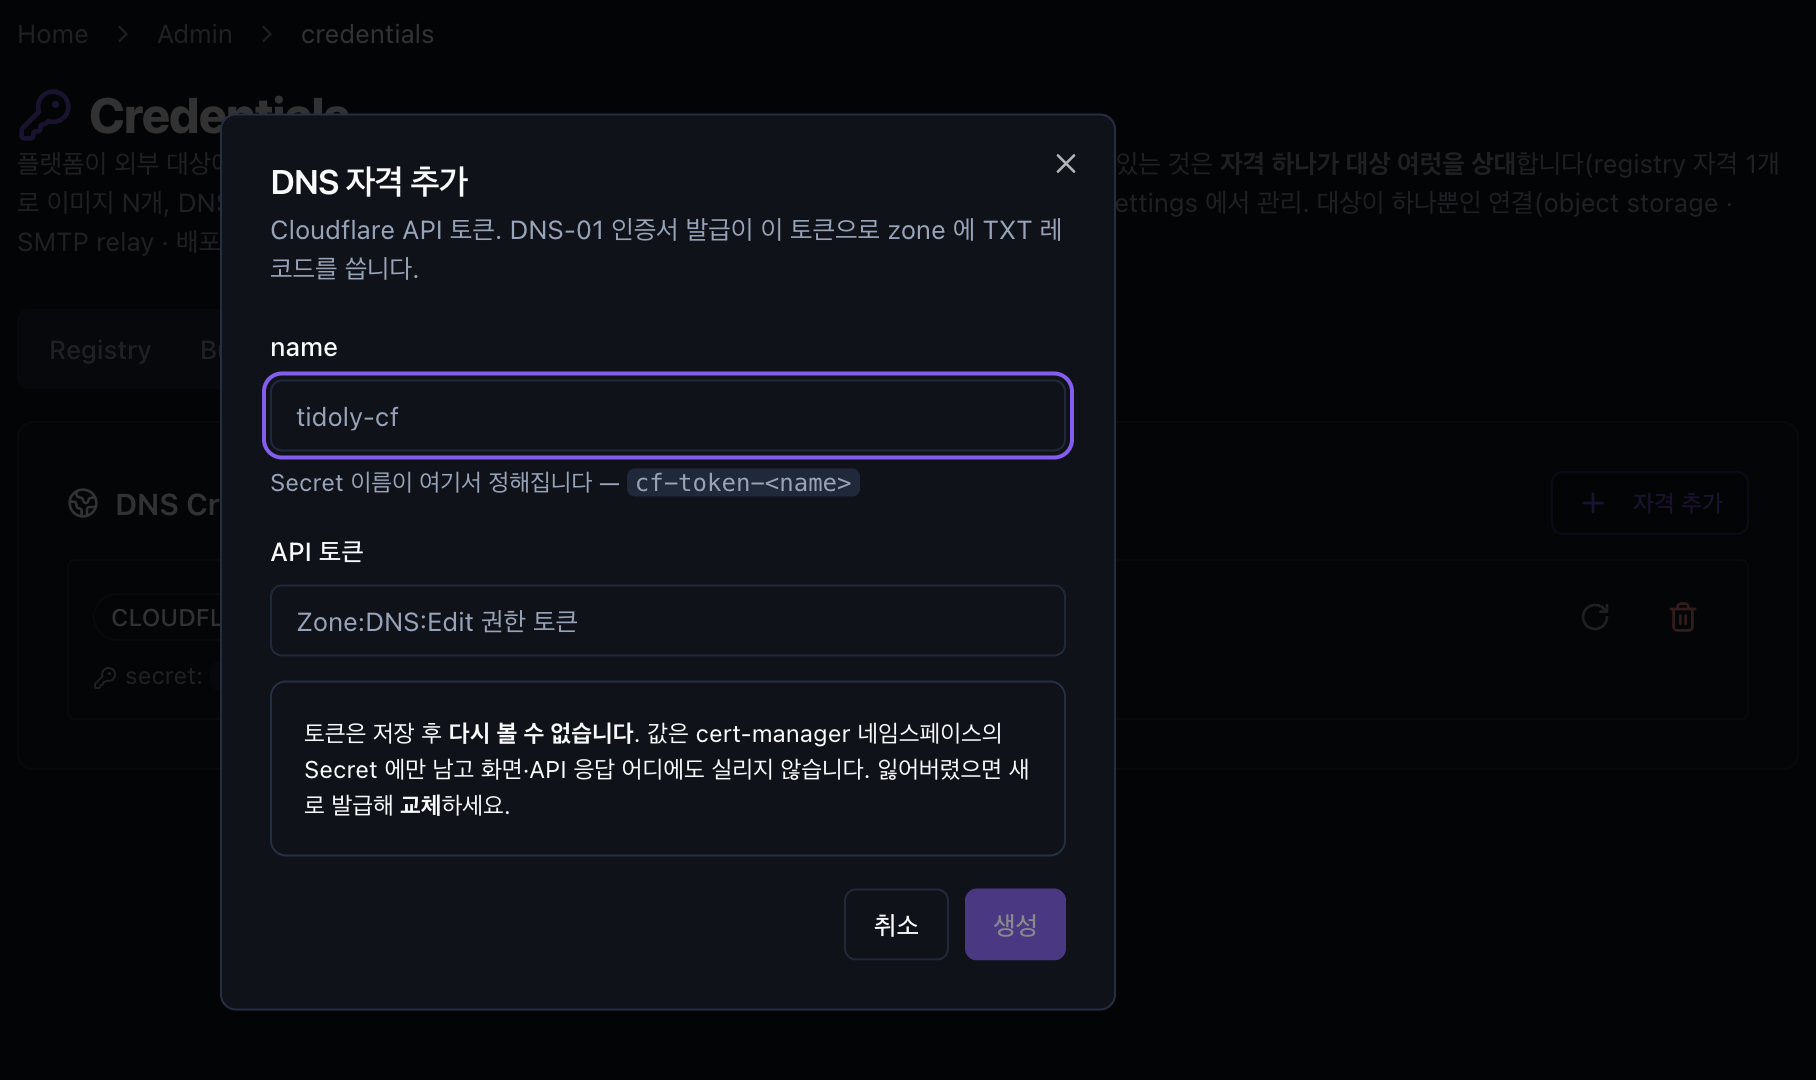
The token cannot be viewed again after it is saved.
If you lose it, issue a new token and replace the old one.
The token needs two permissions
The Cloudflare API token needs both the Zone:Read and Zone:DNS:Edit permissions.
This is because the zone for the certificate must be looked up before the TXT record is created.
A token with only write permission may look fine at registration, but fails at the actual certificate issuance step.
No certificate is issued until you create the issuer
If you only register the zone, the Issuer field turns red with the message "이 사이트에 없는 ClusterIssuer" (ClusterIssuer not present on this site).
When you click the shield icon and create the issuer, it is set to that name automatically.
If this is your first time, test with staging first
Let's Encrypt has certificate issuance rate limits. Turning on staging으로 먼저 시험 (Test with staging first) lets you verify the setup without affecting the real issuance limits.
However, staging certificates are not trusted by browsers.
After confirming the setup, turn staging off and issue again to get a real certificate under the same name.
Making an asset reachable from outside
On the detail screen of the installed asset, click 외부 노출 (External exposure) → 노출 추가 (Add exposure).
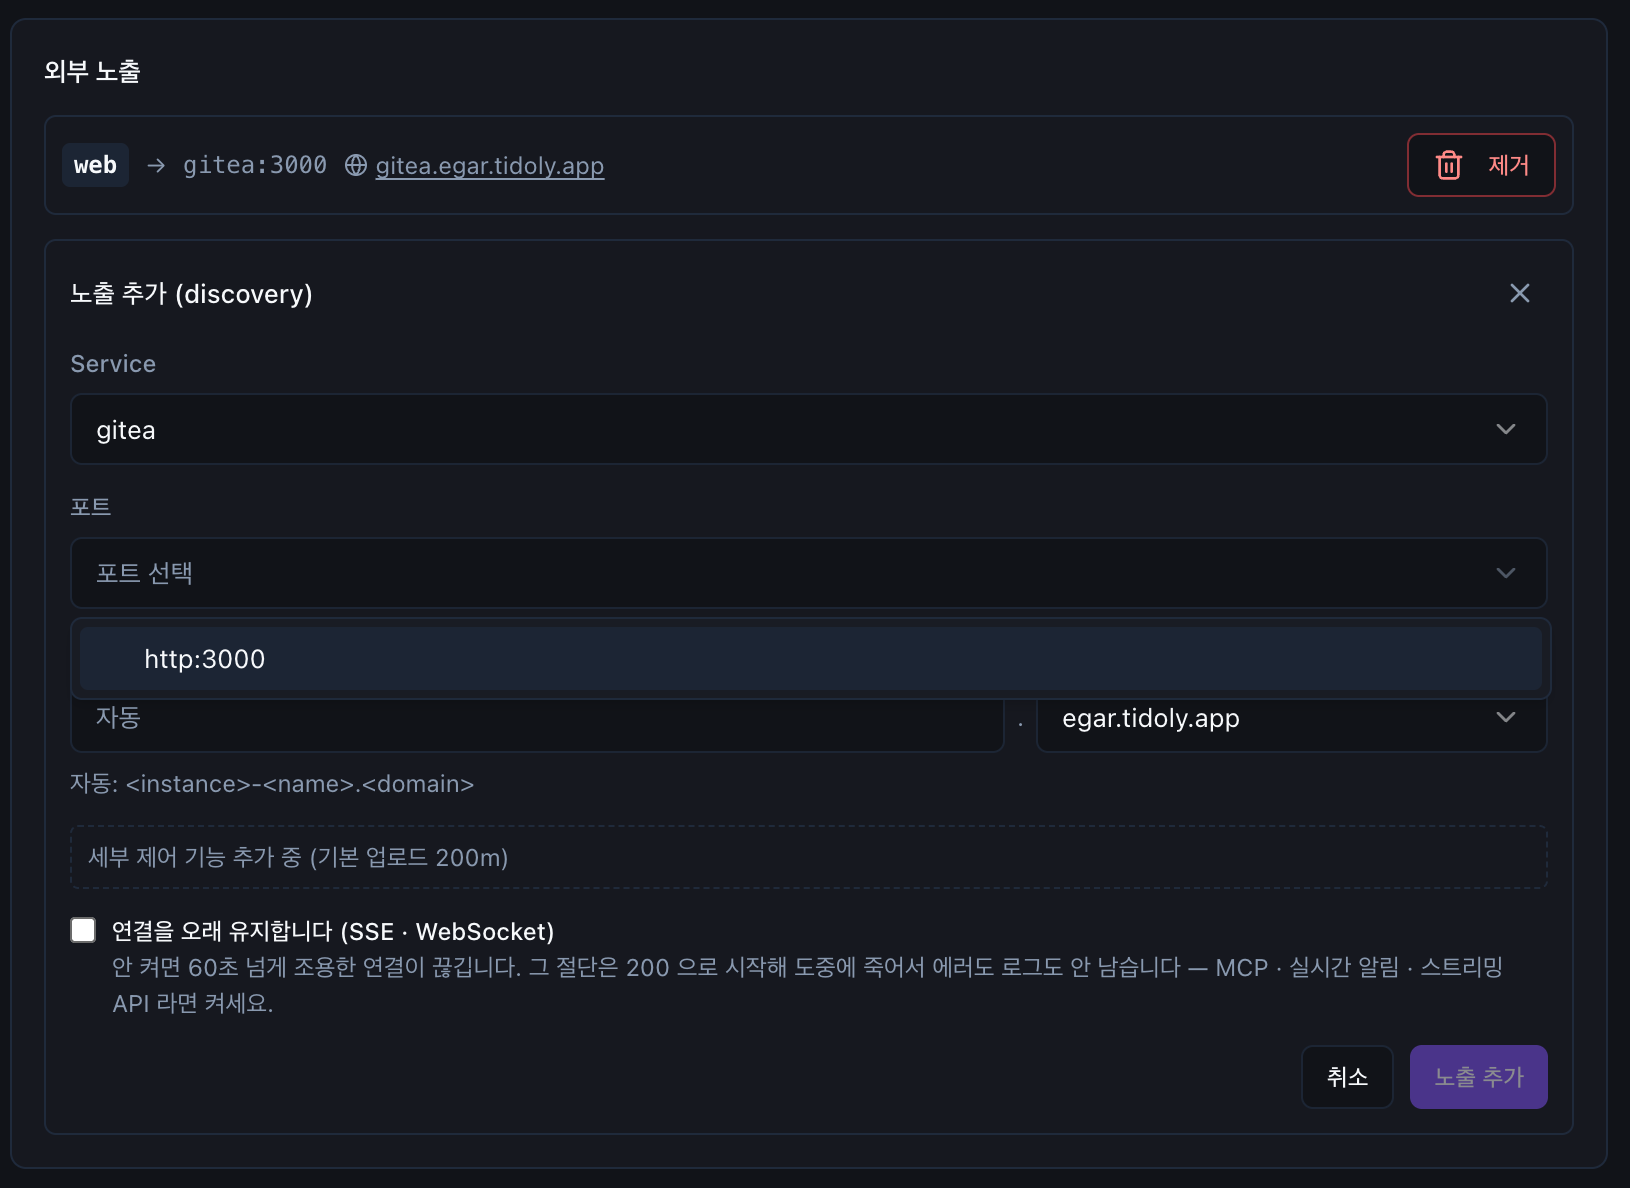
The port is detected and shown automatically, and if you leave the address empty, an address is generated automatically too.
Once the address is set, the certificate is set up along with it.
Turn on the option if you use real-time connections
If you do not turn on the 연결을 오래 유지합니다 (SSE · WebSocket) (Keep connections open long (SSE · WebSocket)) option, connections with no data for more than 60 seconds may be dropped.
In that case, the connection starts normally and then ends midway, so no error or log may be left, which makes the cause hard to find.
For services that need long-lived connections, such as real-time notifications or streaming APIs, turn this option on.
Using it only inside your company
A setup that is used only inside your company, without public exposure, is also possible. In this case you need a domain, but you do not need a public IP.
However, a Cloudflare token is required.
Routers or internal DNS may block access
When a public domain returns a response pointing to a private IP, some routers or internal DNS servers treat it as a security threat and block it.
If access is blocked, you can work around it by registering the record directly in your internal DNS.